
25 Hour Roof Replacement Guarantee - Get Your FREE Estimates!
Residential License # 890459
Commercial License # 3667
Residential License # 890459
Commercial License # 3667

At TurnKey Roofing Contractor, we understand the importance of a sturdy roof to protect your home and loved ones. That’s why we specialize in residential roof flashing repair, ensuring that your roof remains leak-free and resilient against the elements.
Our team of skilled professionals is dedicated to providing top-notch services that exceed your expectations. Whether it’s repairing damaged flashing or installing new ones, we have the expertise to get the job done right the first time.
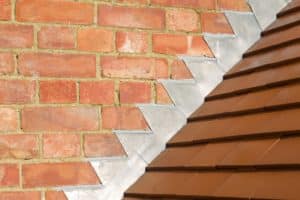
Roof flashing plays a pivotal role in safeguarding homes from water damage. Its correct installation and routine maintenance are essential for prolonging a roof’s life. Timely repairs can also be cost-effective, preventing more severe issues.
Water stains on the walls and ceiling are indications that there are leaks on the roof. Ignoring such issues can cause a bigger problem in the future.
Metal flashing types, including aluminum and copper, face corrosion risks. Environmental factors like pollution accelerate this process. However, applying protective coatings can help shield the flashing from such damage.
Aluminum is valued for its durability and resistance against corrosion, making it an excellent choice for roof flashing. Proper installation is key to maximizing its benefits. Regular inspections ensure aluminum maintains its condition over time.
Copper stands out for its longevity and visual appeal as a material for roof flashing. While it demands higher initial costs, its long-term value through minimal maintenance needs justifies the investment. Preserving copper’s patina requires specific care but enhances its aesthetic contribution to a home.
 To ensure your roof remains in top condition, focus on key areas during a flashing inspection. These include the chimney, skylights, and where the roof meets a wall. It’s wise to conduct DIY checks annually but opt for a professional inspection every three to five years. Using a checklist can help guarantee you don’t overlook any critical areas.
Discoloration on or around the flashing signals potential issues. Causes range from water damage to aging materials. This color change often hints at underlying problems that could compromise your home’s integrity. Upon noticing discoloration, it’s best to seek a professional evaluation immediately.
Water marks inside your house are telltale signs of flashing leaks. To pinpoint the leak’s origin, trace back from the mark to any compromised flashing areas. If you find such marks, acting swiftly is crucial to prevent further damage.
It’s vital to follow manufacturer instructions for any materials you use during this process. This ensures both effectiveness and longevity of your repairs.
Sometimes, roof issues go beyond a simple DIY fix. Extensive damage or complex roof designs necessitate professional intervention. Professionals bring not just skills but also the right tools for effective flashing repairs. They ensure that your home remains watertight and structurally sound.
Hiring experienced roofers comes with benefits like guaranteed quality work and safety. Their expertise in identifying and addressing hidden problems can save homeowners from future expenses.
To select a reputable contractor, look for those with positive reviews and a solid track record. Ask neighbors or friends for recommendations to ensure you choose someone reliable.
License and insurance are two of the basics you have you ask from a contractor, these are credentials that can prove they are legal and reliable. Certifications can also add to their credibility to do the project.
Before making your choice, verify the contractor’s credentials through online databases or by asking them directly. This step ensures that you’re entrusting your home to capable hands.
Experience matters greatly. Contractors with years of service have likely encountered various roofing problems and know how to address them effectively.
Don’t hesitate to ask potential contractors for references or portfolios showcasing their previous flashing projects. This gives you an idea of their capability and the quality of their workmanship.
Experienced professionals guarantee that the repair will be durable, preventing further issues down the line.
Removing damaged or corroded flashing is crucial for maintaining a leak-free roof. The first step involves carefully lifting any shingles or roofing materials covering the old flashings. This requires precision to avoid damaging the layers beneath. Workers should use tools like flat bars and hammers gently, ensuring not tear or puncture surrounding areas.
Disposing of old flashing materials responsibly is also important. Many metal flashings can be recycled, reducing landfill waste. Homeowners should consult local recycling guidelines to ensure proper disposal.
Securing new flashing properly is key to preventing future leaks. The installation process often involves fasteners such as nails or screws, complemented by adhesives for an extra layer of protection. It’s critical to choose fasteners that are compatible with both the new roof and the flashing material to ensure a watertight seal.
Common mistakes include over-tightening fasteners, which can warp the flashing, and using inadequate amounts of adhesive, leading to weak spots vulnerable to water intrusion.
Properly sealing the edges of new flashing further guards against water penetration. Selecting the right sealant depends on the type of flashing material—silicone-based sealants work well for most applications due to their flexibility and durability.
Applying an even bead along the edges and smoothing it out ensures coverage without gaps or bubbles. Allowing adequate drying time for sealants is vital; rushing this process can compromise the seal’s effectiveness against moisture.
For those facing issues with their roof flashing, it’s imperative to take immediate action. Seeking professional repair services, timely intervention can prevent further damage and safeguard one’s home against the elements.
Homeowners are encouraged to regularly inspect their roof flashing and seek expert advice if unsure about the condition or best course of action. Taking these steps ensures a durable, leak-free roof, protecting one’s investment for years to come. Contact TurnKey Roofing Contractor at (504) 608-3921 if you need assistance with roof flashing and other related matters.